Saturday, 19 August 2017

DIY: Game Table (Part III)

"She may not look like much, but she's got it where it counts, kid."

With the clear coat finished, my table is, as one might say, "fully armed and operational". And like the Death Star II, it's incomplete in aesthetics department.

Table all set up in it's new home in our basement. A bench underneath to seat some gamers.
So it will rest in the corner until such a time as more than two people are playing.

I made this table so that it can easily come apart. The playing surface (a sheet of MDF cut to fit) can be removed as follows:
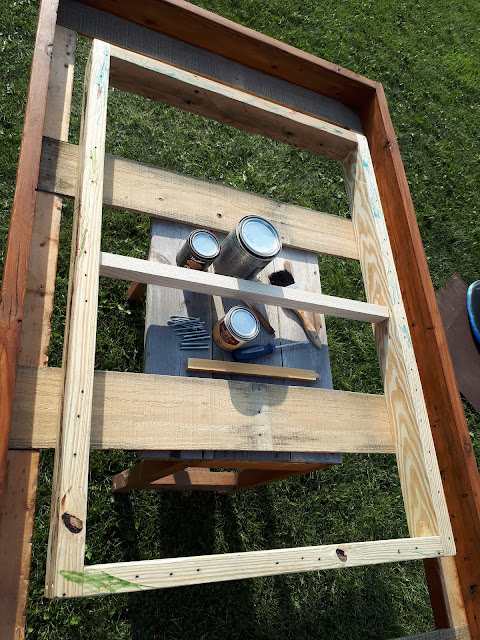
The table sans playing surface.
The legs assembly and the table top are held together with nails which are easily removed to separate the two for easier moving (as in through the house and such).
The crucial nail. Pull out all four and the top can be lifted off.
So, some day, maybe, when I get more stain, I can finish the legs. I'd like to get a covering for the surface as well. I don't know what I want to use though, so it's research time. Currently deciding what to play first on it.


Wednesday, 16 August 2017

DIY: Game Table (Part II)

I work in the recreation sector and recreation seems to be drawn to weekends for some reason. That is why I work on Saturdays and take Wednesdays off instead. Today being Wednesday, I worked on two different projects.

Project 1: Clean out and rearrange the shed.

Jenni and I cleaned out the shed today, threw away a van-load of stuff from tires to wood chunks to a pulley hook thing from some kind of crane or something. We hired a neighbourhood boy to help as well. 

Some stuff is now in the house. Jenni has been working on the craft room and baby room as well (good thing 'cause a baby will be here in January). There is so much floor space in the shed now. It's awesome!

Project 2: Working on my game table.

I knocked the MDF surface out of the table frame and took it outside to stain. I'm using Minwax Iswitch Pine, for those who want to know that kind of thing. I was going to just apply a clear coat to it because that is what I usually do. But I found a conditioner and the stain and decided to be brave and see what came of it. Well, I think it turned out quite nice.

Table frame after the first coat. I'm already digging the darker shade.

Before moving it inside the shed, which can accommodate it now, I wanted to get some legs going for the table. I kept putting it off during the morning and a good thing I did. Jenni decided that she didn't like the table I had made for the kids' play room. I measured it and the length was roughly where I wanted legs to be. The width was just 1-3/4" too narrow to fit tightly between the bottom railings. However, the legs I had on the play table were too short. So I took off the legs and cut some new ones the right length so that the top of the playing surface would be around 30" high, same as the dining room table. Then I cut rabbets on each side of the legs so they will fit snugly between the playroom table frame and the game table frame. I've also devised a way to attach them such that I can take them apart easily if needed.

Sizing up the play table frame.

Things are coming together nicely. This is how I left my table for the night. may it dry nicely in preparation for the clear finish.

I was going to cut notches into the play table frame that would accept the two middle stringers, but as I looked at it tonight, I thought it might be just as good to add stringers right on top of the play table frame instead. Either way, the main function desire is to have a way to fit the two pieces together easily. Also debating putting a finish on the legs. They are a different kind of wood and have already cured to a colour similar to the stain I used on the top.

I'm thinking with a little luck, I can have this ready to install by the time Jenni goes off camping with the kids next week!

Monday, 14 August 2017

DIY: Gaming Table (Part 1)

I finally started building a gaming table!

I finished the tabletop tonight, save applying a finish to it, I'll have to do that later. So far the only thing I've purchased for it is some MDF for the playing surface. The rest is reclaimed lumber, so it's going to look rustic. The side walls were 2" x 8"s from some corral fence or something. I ripped them in half to make 2x4 size walls. The one side was worn by weathering. I sharpened up a plane (used by my great-grandfather) given to me by my uncle. I used it to plane one side smooth, quite a bit of work but quite fun and satisfying. Some pictures to show it off:
Vaulted tabletop! Yaay!
The grey bits are where the weathering wore away the wood between the fence slats. I planed the other side and used it as my straight side to shave the slat side to what is seen here.

Bottom view showing cross members and underside railings to support the MDF surface and to hold the frame straight.


Tried to get a play surface of 3' x 5'. Didn't quite happen as I ended up with 3' x 4' 11 3/4"! Close enough!

Now to get some legs on it, then a finish, probably just clear coat of some kind. I'm thinking about making some kind of box-like frame for the legs. It would be something that could be easily detached so that I can move the table in and out of the house ('cause I won't be applying a finish to it in the house).

Stay tuned for part 2!

Tuesday, 4 July 2017

Painting: ARC-170 (Micro Machines)

Some photoshop skills on a not-photoshop software! Background image from PatternPictures.com.

I finally got around to re-painting some more Star Wars. This time, it's the ARC-170, first seen, so far as I'm aware, in Star Wars III: Revenge of the Sith.

These were fun to paint. If I were to do anything differently, I would have used a lighter pigment in the wash I applied near the end, not black. Still, they turned out alright and I keep taking them down to look at them. I've liked the design of the ARC-170 from the first time I saw one. I think it's because the fuselage and engine cowlings are reminiscent of World War II and Crimson Skies aircraft designs. Thus, I felt like a paint job that wouldn't look too out of place in that time period would look really good on these. I am not the first to have had the same idea as with an image search it seems one guy made one up in the German mottled camo design used on their jet fighters and another guy did one up like the Red Baron's Dr.1.

So on with the pics!


I wanted them to look like they belonged together, as though part of the same flight wing or squadron, so they were painted at the same time and same base colour. You will notice that the areas painted red are the same for both (unless you happen to be colour blind maybe). Only the yellow is applied in unique ways, as though the crews had the option to add yellow paint how they liked.

I keep telling myself that one day, these guys are going to see some action. If I repeat it enough, it's bound to happen. Right?

Wednesday, 14 June 2017

Whittling away: Birdie

So I've been finding these burls on fallen branches of the trees at my workplace. They are poplar trees. Don't know what causes the growth but I've been carving off the softer outer layer to see what the wood looks like inside. This particular one had a particular look right away, so I whittled it down until I got it.

Tonight I painted it up just for fun.


I left the soft outer covering on the bottom part and left it unpainted. Looked more natural or something.

Framed!

I made a frame for my aunt. She will be giving it away as a gift (sans livre).

First book I picked off the shelf. It fit perfectly!

Friday, 12 May 2017

Game-Related Movie: Battleship

Classic Battleship
Yes, I watched Battleship. The movie based on the board game. Except that the combatants are a navy and a bunch of aliens that seemed to have decided that an aquatic base of operations was the optimal way to take over the Earth. Why not? The British did pretty well for themselves that way. Other things that the movie used from the game? How about setting up a virtual grid over the sea with which to direct Aegis missile fire? Or my favourite, the ordnance used by the invading aliens: explosive canisters shaped like the hit/miss pegs in the game.

In all the movie was better than I expected in some ways, though worse in others. Score one for the retired crewmen showing up to power up the retired USS Missouri (the first model ship I ever built) and score the winning blow. Also refreshing to see a veteran amputee as a main character. Actually, those were the highlights of the movie.

The aliens were really confusing, or just seemed confused themselves, which they might have been, having landed on a strange new world. They are trying to 'phone home' using the messaging system that signalled Earth's existence to them in the first place. They seemed to be okay with leaving humans alone, including (apparently) letting one go that had snuck into their camp, letting him just walk away with with a suitcase of super communication stuff. Were they just preserving their live for futures as slaves to the new alien overlords? Instead, the invaders prefer to destroy mechanical things and inert structures. But only some of them? No-one taught them to finish a job or what?

But the biggest laugh for me was the naming of Landsat 7 as the special satellite used to send the signals (or rather, boost them) toward the Earth-like planet. But, I guess only those familiar with Earth observation remote sensing would know that Landsat 7 (a) does not look like that, (b) is concerned only with looking at earth, not beaming signals to Rigel 12, (c) has a 16-day revisit rate, not 24 hours, and of course (d), it's broken, but that's beside the point. That point being, if you're going to have a fictitious satellite, why not give it a fictitious satellite name? How about Quarterback? Because it's passing a message. Or TinCan, 'cause it resembles a tin can phone when beaming the message? Anything!

Oh well, what more can one expect? It was an enjoyable show to watch while doing the laundry.

Further thoughts:

The aircraft carrier survives without a scratch. Don't think I've ever played a game of battleship and have a carrier survive.

During the 'sea grid and missiles' scene, the captain directing the firing should have called out D-3 (Delta 3), H-6 or one of the other coordinates that resulted in the famous "You sunk my Battleship!" from the commercials.

There were no cruisers or submarines. Cruisers may not have been much different from what was in the show, but the aliens did not seem to have an effective defense against underwater attacks. Seemed like a sub or two could have laid waste to the big boss alien structure, though I guess the shield extended under water to an unpassable depth and no sub were trapped inside. But come on! I want to see the USS Dallas pull an emergency surfacing maneuver again! "Come on, Big D! Fly!"

Photo source: www.pexels.com/photo/battleship-game-old-school-vintage-84833/, free use license.